
| | You are here : Home > Museums > Herbarium > How To Make a Herbarium How To Make a
Herbarium
CONTENTS
 | LOOKING FOR PLANTS: WHEN AND WHERE  Almost all natural environments are suitable for searching for plants for the herbarium, so you must not overlook places which could appear sterile and dry. Even in the cities is possible to look for plants, just do not take specimens from the parks and gardens! At first you could rely on the richness of the flowers and plants which live on grasslands and prairies, but you will soon notice how easy it is to find interesting specimens during trips to the mountains, swamps, coast, woods or wherever the climate and the temperature are not too extreme for plant survival. |
The most important part of every collected specimen is the flower, so the best seasons for picking up plants are spring and summer; but remember that certain species show their flowers in autumn or even winter, so do not neglect colder months for your excursions. As you can read in the books, a few plants have a very short blooming time, which you must strive to catch them at!
The most convenient specimens to pick up are those which seem quite dry, and lacking any trace of surface moisture. For that reason it is better not to look for plants during rainy days, or early in the morning. Also, the hottest hours during summer days should be avoided, as plants will not show their freshest appearance. NATIVE AND INTRODUCED SPECIES A herbarium with scientific merit usually relies on the plants which grow naturally in a specific geographic area, so it is important to distinguish between the wild species which actually are your object of interest from those who have grown after a human intervention, as happens for some garden flowers or most cultivated plants. Anyway it is also true that often a plant species previously introduced by man can continue to spontaneously grow outside its original artificial environment; in that case the plant can actually become a new element of the spontaneous flora and can consequently become part of a herbarium. During your excursions you will discover that it is not always easy to understand whether a plant is still an introduced species or has become a wild plant; a suggestion for that purpose could be of looking nearby for gardens or cultivated fields from which that particular plant might have originated, without having gained any level of actual spontaneity. TOOLS Some tools are rather important while picking up plants for your herbarium: A small knife, scissors, thorn-proof gloves and a small handy spade could be of great help. The collected specimens should be put into a strong bag made of cloth or polythene or similar material (plastic etc), the function of these containers being to protect plants from damage during your outing. If your excursion takes place in summertime or lasts for two or more days, it is better to bring a folder of approximately 45x30 cm or more. The folder must be made of cardboard or some other strong stuff, e.g. aluminum, and it must contain some old newspapers (the more plants you collect the more newspapers you need). The folder can be covered with cloth and it should be closed with straps or belts, and a handle or shoulder-belt should be added for easy carrying (see. Fig. 1 and Fig. 2). | 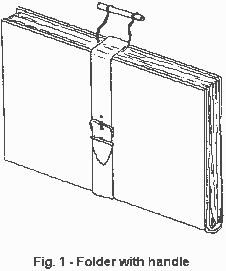 |
The picked specimens must be arranged inside the folder between a few layers of paper, so that every plant has some paper on both sides. The closed folder does not have to press the specimens too firmly between the newspapers. If the plants are fleshy more newspapers are needed and you can also add some additional cardboard inside the folder. Small delicate plants should be placed inside smaller bags. A large waterproof bag can be carried too: it will carry aquatic plants and can be used to cover the folder in case of rain. 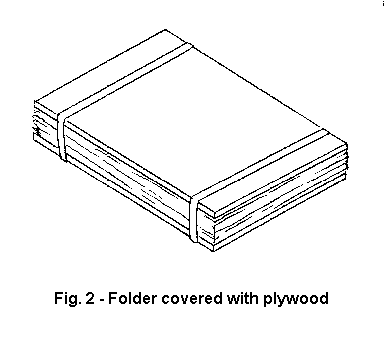 | The folder could be made in some different way too, for example a couple of plywood boards containing some newspapers, the boards can be kept together with some large rubber straps or ropes. Blotting paper can be used instead of newspapers, but the latter is much cheaper, as you do not have to buy it just for the purpose of the herbarium. |
PICKING UP PLANTS The plants which you are interested in should be fresh and not wet (apart from plants which live in aquatic environments of course), so keep away from old or damaged plants as long as you can find fresh items of the same kind.
If you wish your herbarium to have a scientific value is important that every plant is coupled with written information about the place and date of finding and the terrain characteristics. So while you are out looking for plants you either must remember the place you found each specimen, or add a label with written information to some or all the specimens.
When you pick up plants from the natural environment, keep in mind that you will have to fix up all of them once you return home, and you will have to classify them too, in order to achieve a scientific value for your herbarium. Those operations require a substantial amount of time, so try not to collect so many specimens that you can not find the time to settle and study all of them. You will have to section and basically tear apart some flowers during your classification, so do not pick up just one or two flowers of each species when you are out looking for plants, otherwise you could be forced either to sacrifice every flower for the classification job or to simply give up the classification. You also must keep in mind that it is not always possible to get a successful classification if you do not have particular parts such as seeds and roots, so try to pick them up when you are looking for your plants. You can bring along some small bags or envelopes which should contain seeds and other small separate components, just remember not to not mix the seeds of different plants! Sometimes the seeds are necessary for a successful identification, but during some particular excursions you could happen to pick up the plant when the seeds are not yet formed; in that case it is advisable to return in the same place some weeks later, hoping to find some newly grown seed. Otherwise, if you can't find the seeds you may have to rely on some different books, or ask some expert to help solve your taxonomic problem. That kind of trouble happens also with species that bloom before having the leaves formed, or other similar situations. Actually, many herbaceous plants are too bulky for the average sized herbarium, so often you will take only a couple of branches, or only a few leaves of a specimen. Anyway you must pay attention not to forget some relevant part which could pass unnoticed at first sight. For example some plants have different leaves depending on their location on the main stem, and you could happen to take only one kind of those leaves. Once home, you will have an incomplete specimen, and it could be very difficult to classify a plant lacking one or more important characters. Some plants have short lived flowers which are deliquescent and will break up in pieces unless picked early in the day and immediately pressed in the folder you must have during the excursion. Before putting your specimens in the bag or the folder you should carefully remove all the insects, spider-webs and foreign bodies attached to your specimens. RECORDING DATA Your herbarium could encourage the collection of many written data which can actually increase the botanical knowledge of certain geographical areas. Hence it is a good idea to write down various information regarding the specimens you are picking up; these notes not only will help the identification of the specimens, but also can be compared and added to the current botanical knowledge. A note-book can be used, otherwise a tape recorder with tapes and a number of batteries could make this work easier. This is a list of what you could record to add many valuable information to your herbarium:
· locality: be precise, if possible include the longitude and latitude and also a sketch map if useful
· habitat and ecology: terrain characteristics, vegetation type, associations with other plants
· plant habit: describe the overall size and shape of the plant (tree, bush, epiphyte etc.)
· stems and trunks: height and diameter; color, texture, thickness and hardness; the presence of thorns and spines
· leaves: deciduous or evergreen; color, texture and overall aspect; orientation; exudates or glands
· inflorescence and flowers: note of everything that could be undetected in prepared specimens; color; heterostylous, monoecious or dioecious; different behavior (open / closed) during the day; exudates or glands; pollinators
· fruits and seeds: size, shape, color, texture; smell
· underground organs: take some samples or describe them (size and shape, tap root, tubers, bulb etc.)
· scent: record any particular scent, especially of cut parts and flowers
· sap or latex: note the color, smell, consistency etc.
· name: record the locally used names
· uses: record the uses, getting confirmation TAKING PICTURES Taking color pictures of each plant in its natural environment is also something which could substantially enrich the quality of your herbarium, not only aesthetically, but also from the scientific point of view. In that way the dried specimen can be placed together with one or more photographs, which are very helpful for bulky plants like trees or bushes, which obviously can not be entirely included in a herbarium! Also the habitat of a plant can be well described with a photograph, taking care not to be too distant from the nearby bushes or trees.
The suggested equipment is a 35 mm. single lens reflex camera, with a standard lens and a macro-lens, the latter very useful for close-ups of flowers and other specific features. Also a tripod can be very important if many close-ups have to be made, allowing the camera to remain steady. A tripod can also alleviate the need for a flash, which may be used when taking pictures in low light, but has the disadvantage of giving quite unnatural looking images. The speed of print films can range from 64 - 100 ISO to 200 or 400 if pictures in the woods are planned.
Each photograph you take should be recorded in a note-book to provide further data for the classification and to include in the herbarium. Be careful that your camera and films are not damaged by rough handling and do not become wet. PROTECTED SPECIES As with animals, some species of plants are protected by the law, so it is not wise to pick them up from the environment. In certain areas, such as parks, there are particular laws that often do not allow the gathering of any plant; for this reason you must collect all the information concerning this matter before going after plants in such areas. Some rare plants are protected in the whole territory of some regions or districts; it is your responsibility to get a list of the protected species.
Maybe you could get permission to collect some protected species too, but that's something you must ask for yourself with the proper agency. You can also substitute color photographs for samples of the protected species. Anyway it is wise never to pick up an excessive amount of specimens of the same plant, especially if you do not see many of them around. Just harvest the minimum number of plants you need for classification and collection. AT HOME: IDENTIFICATION AND CLASSIFICATION Setting up an herbarium can be a work of remarkable scientific importance, as you will contribute to the knowledge of the vegetal populations of the areas you examined while looking for plants. Sometimes you could discover a new kind of plant (i.e. a subspecies or an endemic form typical of a particular area) and your data will be added to existing botanical knowledge. Anyway, any seriously considered collection of plants must report the most exact taxonomic denomination for each specimen, along with the date and place of collection. The name you should apply to ever collected plant is the scientific name, a Latin noun which represents the only denomination that unequivocally identifies your specimen. BOOKS There are various books available for the classification of plants, some are very complete and expensive, others are handbooks reporting only a particular group of plants (e.g. from a certain geographical area, or from a typical habitat), others acquaint the reader with every kind of plant with little or any limitations, but they can not actually cover all the specimens you may find during your travels. To actually gain the ability of classifying every plant you pick up, you need one of the books that describe all the species (and hopefully the subspecies too) of plants living in the region of your interest. This kind of book usually includes only black and white pictures, often drawings, and focus on all the parts (fruits, flowers, roots etc.) that can help the one who is trying to classify a plant. Of course you are encouraged to buy further books which have some further utility with their color photographs of the most common species. COMPARING THE SPECIMENS TO THE BOOKS DATA During this job, as you have to carefully examine very small and complex parts like flowers internal features and little seeds, you will need some very important instruments such as a magnifying glass, tweezers and a cutter.
It is also important that you try to finish your classification work before the plants start to wilt, in fact to compare your specimens to the books descriptions you must hold fresh plants, otherwise your work could become very difficult and maybe wrong in the end too. By the way, if some plants seem already rather wilted once you return home, you can place them in a vase or in a bottle, letting the roots (or the bottom of the stem) in contact with water. Some elements which can help to renew the plant can be added to the water, they are a piece of rusted iron, some wood coal or one teaspoon of sodium nitrate. Doing so, after one day you will have proper specimens to be studied and dried. If some flowers dropped after you picked the plant, new flowers could bloom in case there were buds in the plant.
Nevertheless, sometimes you will discover that you do not have any other choice but ask to some more informed fellow plant collector, even though you gathered all the components of the plant and did your best with the books! DRYING After you have found the name of the plant, you must hurry to go on to the drying process. Remember to work in a dry and ventilated room, avoiding damp, which could easily harm your specimens. Flowers and other plants parts must be dried up into a peculiar kind of press. It is not difficult to build a home-made press for that purpose, keeping in mind that what must be accomplished is to keep the specimens squeezed between layers of paper (newspapers or blotting paper) until they are totally devoid of the original content of water, that is dried. As for the folder previously mentioned, the upper and lower parts of the press might be made of heavy cardboard or thick plywood or equivalent material. The specimens will be placed between the layers of paper, which will be pressed by the two pieces of wood; these two pieces must be held tight by putting some heavy body on top, i.e. bricks or large books (Fig. 3). | 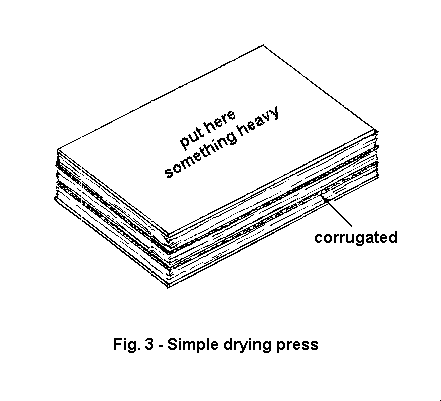 |
It is important that the plants are put under sufficient pressure, otherwise more time will be required to achieve a good desiccation, besides they could be damaged by dampness and moulds. Every specimen in the press must be linked with its own written data, the best you can do is to use a tag for each specimen, you can attach the tag with string.
As circulating air is very important to get your specimens dried in a short time, it is better to add some corrugated cardboard sheet between the paper layers, so that some air can penetrate and speed up the drying process. Corrugated aluminum sheets are even more effective than cardboard. Bulky parts can directly be placed in contact with corrugated material to speed up drying. If no such material is available, keep the filled press size small. Instead of newspapers, someone recommends to use blotting paper together with tissue paper: at the base of the press you should place about three layers of blotting paper, then one layer of tissue paper (or paper handkerchiefs) on which the specimens will be placed, another layer of tissue paper and finally three layers of blotting paper; several such strata can be put in a single press for a good drying up! Anyway you must always be sure to have enough paper at home, also in case you need it for the folders you bring some during long trips; the large amount of paper you need suggests the use of newspapers, which are cheap and usually widely available. 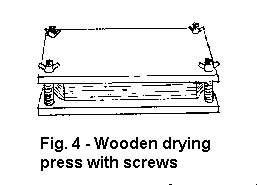 | A more advanced kind of press might be built for an optimal drying of your plants. This press can be made with two wooden boards with screws and nuts placed at each corner: turning the nuts the two boards will come closer pushing together the paper with the plants (Fig. 4). This kind of press can be built at home or bought in some art tools stores.
The press should be exposed to a gentle heat source, avoiding excessive heat that will "cook" the specimens. If fire is the heat source, keep the press at safe distance to prevent fire starting on the press. Sometimes it is also possible to exploit the heat from the sun. In this case the presses must be rather small. |
Changing the paper is surely a very important step whose importance must not be underestimated, though it could become pretty boring if you happen to have many drying specimens! In the first three or four days a paper change should take place every day, then you can leave more time between two changes. If you neglect the change of paper the plants will take more time to loose their water content, besides they could be damaged if the paper stays wet for a few days. While changing the paper you must try to keep the specimens intact, besides you have to not mix up the tags or labels with the name and the other information regarding the drying plants. The minimum time required for complete dying ranges from two to four days or more. A single species could have some separate parts already dry when the other must stay in the press, just remember not to mix or loose some parts. Once a specimen has become dry and stiff, it can be placed into the herbarium. SETTING THE PLANTS UP FOR THE HERBARIUM One of the most difficult steps is gaining the right arrangement of the specimens in the herbarium. The arrangement must be carefully considered, since when you place the specimens into the press they will acquire a shape and appearance that will last after the drying process, and so be similar or identical to the specimen's shape in the herbarium. Because of size and thickness limitations, it will probably be necessary to remove certain branches, leaves and bunches of flowers, or to carefully section them, always with the goal of obtaining a more suitable specimen to be placed in the press. Carry out this delicate job with the help of a knife and tweezers, trying to arrange the flowers in the best possible manner, letting them show the most natural shape and all their features. During this process care should be used to avoid the elimination of relevant elements, especially those which were important for the taxonomic classification. Any loose part may be kept inside paper envelopes which will be placed on the same mounting sheet as the specimen. Each species should also display both sides of its own leaves; if only one leaf is available, you may cut off a part, so that the other side can be observed. If you have more than one flower available, you can arrange some to show the back of the flower also. Depending on the size of your herbarium folders, you will be able to dry more or less large specimens; anyway it is almost sure that some plant will have to be cut or bent, due to its excessive size. When bending a stem, form an acute angle and always try to give a not too unnatural appearance to the whole.
While arranging the specimens on the paper layers, various plants can be placed on the same piece of paper, but remember not to superimpose two or more specimens upon each other. It is better to choose specimens of the same thickens so that the pressure on that layer will be equally distributed. If rather thick parts must be placed in the press, try to get an uniform thickness by {placing some pieces of paper near the more thick elements, so that the layer with the plants will have approximately the same height} [building up the thinner sections of the arrangement with extra paper, so the layer will have approximately uniform height]. SPECIAL TREATMENTS Some particular group of plants must be specially treated to achieve a good drying and durability. Cactus and succulent plants must loose their high percentage of water before being put to dry. To do that they must be placed below some blotting paper sheets, on them you will rapidly pass a hot iron. That must be done a few times, always changing the blotting paper. Before the iron treatment, the softening of the cactus can be aided by the immersion in boiling water for half a minute, taking care of avoiding the immersion of the flowers. Instead of boiling water you can employ diluted acetic acid or strong alcohol (20 minutes) or formalin (1.5 parts formalin, 1 part water). Since most cactus are really bulky and fleshy, it is appropriate to just keep and dry sections of the whole plant.
Some plants have tubers or bulbs as roots, and they must be treated before drying. As with cactus plants, a few minutes in boiling water softens the parts. Remember to immerse in water only the roots you have to treat!
Many plants have some (or all) parts which are so bulky that it will be possible to dry only a longitudinal section (e.g. of the stalk or the inflorescence), so it may be necessary to eliminate most of the internal parts and pulp, leaving the external features untouched. Conifers and heathers generally loose the leaves during desiccation; to prevent that the use of warm paper is suggested, adding some passes with a hot iron. It could be helpful to put the specimens in boiling water first, then drying them as fast a possible. Before the drying process the small branches and the leaves can be smeared with diluted liquid universal glue like Vinavil (glue used for plastic, wood, cardboard, leather etc).
Many flowers change color in some way during the drying process; usually that is not any real trouble for your herbarium, but some flowers show a dramatic change, particularly some violet, blue and red petals. To prevent that problem it is vital to achieve a fast desiccation, with many changes of the paper sheets. Other suggested methods are to put the drying plants in contact with salicylic acid sheets (the sheets previously wetted with a 1% salicylic acid solution); another practice is to immerse the flowers in petrol (American equivalent: gasoline), then they must be air dried and finally treated with the paper sheets as the other flowers.
Some plants have rather fleshy flowers (some orchids, iris, lilies etc.) that must be filled with cotton wool before being put to dry. Every time the paper is changed, the cotton wool should be replaced too. The parts can be dried separately and then the flowers will be reassembled with the help of gum Arabic. If the flowers are likely to stick to the folder and break when handled, you can detach them and dry them apart using tissue or non-absorbent toilet paper, opening their folders only when the flowers are well dry. MOUNTING THE SPECIMENS ON PAPER Once the specimens have been dried, they will be mounted on a paper sheet. Doing so, you will display the specimens and its data in the most clear possible way, and the specimens will be carefully preserved being attached to strong mounting paper. ARRANGEMENT It is very important that the plant be arranged so that you can immediately see all the main characters of that particular species, at least if you want a scientific kind of herbarium; so do not look only at the aesthetics of the mounted specimens. For that reason the dried specimens which do present their characteristics well will be further arranged, bearing in mind that a dried plant can easily broken if handled without care (it is advisable to arrange them before being placed in the press). The best manner to place the plants on the mounting sheets is to align them with the right side of the page (or diagonally if space is required) and to have the heaviest parts and specimens at the bottom (see Fig. 5). The longest specimens can be folded if that can prevent the cutting the stem into pieces. It is better to leave an empty space at the borders of the mounting sheets; but you can either arrange your specimens (along with the labels and envelopes for small parts) in a regular way from page to page, or stagger the specimens at different positions on each sheet, so that each group of sheets will have a more equally distributed pressure. |  |
 | PAPER The best permanent support is good white or cream cartridge-type paper, in particular 100% rag or chemical wood pulp. The size for mounting paper can range from 42x26 cm. to 45x30 cm., even if you will need larger sheets for some bulky specimens. Anyway it is up to every collector to choose the most suitable size, which depends also on the cabinet or box which will contain the bundle of plants.
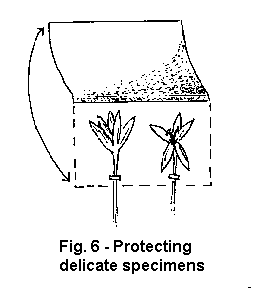
The most delicate mounted specimens could be covered with a protective sheet of translucent paper, which must be rather strong and easy to fold. This paper can be used also to cover only parts of plants, such as fragile petals (Fig. 6). |
SMALL ENVELOPES Small paper envelopes can contain particular portions (e.g. seeds) or very small plants; when these envelopes are folded and glued to the sheet it should be possible to open them flat and close them without clips; besides they must securely hold their contents (Fig.7). | 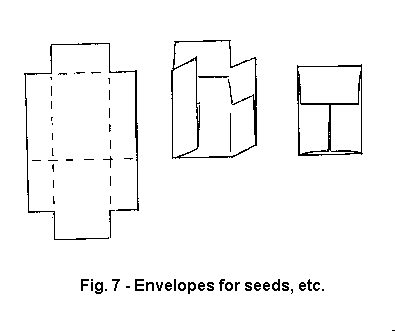 |
 | MOUNTING There are different ways to mount the specimens to the herbarium sheets:
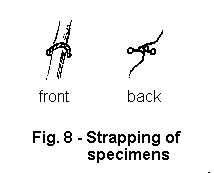
· Strapping: this method will let you to remove and examine the specimen every time is needed, but will allow a certain degree of movement which can cause some trouble. The specimens can be strapped with linen or cotton thread, that will be knotted on the reverse side of the sheet, where it is better to add some gummed paper to avoid contact with underlying specimens (Fig. 8). Also gummed linen tape, like the one used by bookbinders, can be used; it must be placed where the specimens have greater strength, avoiding covering delicate details such as flowers. |
· Gluing: if glue is chosen to mount the specimens, try water-based woodworking adhesive or library pastes or latex adhesive, which must be applied quickly, taking care of not using an excessive amount. You can employ a brush or a nozzle applicator, otherwise the specimen (especially if it is a small one) can be put in contact with a plate full of glue then attached to the sheet. Be always careful not to detach any fragment or part from the plant and not to soil the specimens during the process. Glued material should then be left under pressure overnight, covering each sheet with waxed paper and with drying paper. With aquatic plants only latex glue is the right solution for gluing the specimens, as these plants can take up water from the glue. · Pins: some herbaria have their specimens mounted using small paper bands which fix the plant to the sheet with the help of pins. The strip is placed on the stem (or other crucial parts of the specimen) and the pin joins together the mounting sheet, the stem and the strip, passing below the specimen (Fig. 9). As for strapping, this manner leaves a remarkable freedom of movement for further examinations.
· Nothing: some collections have been made leaving the specimens free on the individual sheets, avoiding strapping and gluing. You can do so, just be careful every time you handle the sheets, and place the bundles in safe boxes where they can not move. | 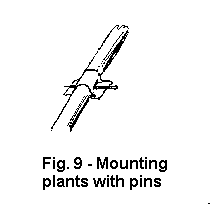 |
LABELS Each specimen must have a label on its own sheet, which should include the taxonomic denomination (at least family, genus and species) along with information on the date and place of collection. If you want, more details can be included, such as ecological notes about the locality. The name of the collector and of the individual who did the determination should be added too. Anyway read the "Recording Data" chapter to see what can be included in every single label. To write your labels it advisable to use permanent and water resistant ink (black or blue), otherwise a pencil can be used (medium lead).  | HERBARIUM ORGANIZATION The mounted specimens will be placed in bundles, which could be kept together with the help of strings or straps, besides it is better to have cardboard or millboard supports at top and bottom of the bundles, to gain further steadiness (Fig. 10). Each bundle must have its own label so that you will be immediately able to recognize the contents of each particular group of specimens. The labels must be easy to read, so they will be placed on the outside of the bundle. Depending on the number of plants in each bundle and on the criteria chosen when dividing the collected plants into groups, you will write down the geographic origin or the taxonomic level (family, genus etc.) or whatever identifies every particular bundle. |
Your herbarium must follow a certain arrangement which will give some logical and scientific order to the collection. Again, you should look at the books to find how species, families and so on are currently arranged, then you can divide your specimens into groups which will reflect the systematic arrangement. Note that there are various systematic arrangements that can be followed, it is up to you to opt for a recent (an maybe simple) one; you can ask some expert to have information about that topic. You could also choose to divide the specimens by their families (or even genera) alphabetically, or else you can group them geographically.
These collections of specimens should then be kept inside boxes or cabinets which should remain tightly closed and dust-proof. The best places you can choose for your herbarium should be safe from the danger of fire, floods and other accidents. The temperature should be around 20 C and the humidity should not exceed 60%, in order to prevent fungal infections. Adequate ventilation is required, especially if the herbarium itself has a high concentration of insecticide or fungicide. A dry room is the best to avoid proliferation of insects and consequent damage. Naphthalene and paradichlorobenzene (PDB) are chemical repellents often used for preventing infestation; anyway they are very effective only at high concentrations, which increases the risks for human health. Other products which have been used in large herbaria are mercuric chloride, cresol and LPCP, but they are complicated to use, and the results can be dangerous to human health too. COLLECTING OTHER GROUPS OF PLANTS It is also possible to build a herbarium with ferns and other non- vascular plants such as lichens and fungi. Here is a brief description of the main topics regarding this particular kind of herbarium. PTERIDOPHYTES The ferns and allied plants are grouped together in the Pteridophytes; among them there are some rather well known species, such as the ones belonging to the genera Lycopodium and Equisetum. Typically, Pteridophytes have photosynthetic organs called fronds, which resemble the leaves of vascular plants. Most of the ferns have their spores in sporangia usually found in the margins or under the fronds; this is a very important feature as these plants must be collected when they are fertile, otherwise no identification will be possible. In many allied plants the spores are arranged or aggregated in different manners, as you will see in every detailed botanical book.
If you are interested in collecting these organisms remember to carry a x10 hand-lens to look for the presence of sporangia. To gain a successful identification it is also advisable to collect part of the rhizomes, examining their covering elements and the appearance they give to the plant. Smaller ferns sometimes have long rhizomes which can form mats even with different species, so they must be carefully distinguished. With larger ferns it is important to collect and dry all the most significant features, even if some will be cut into pieces. Note or make a picture of all the aspects which can not be seen in the collected parts. BRYOPHYTES These small non vascular plants include mosses (Musci), liverworts (Hepaticae) and hornworts (Anthocerotae). Their life cycle includes a long-lived green phase (gametophyte, which reproduces sexually) and a short-lived sporophyte which reproduces by spores. It is better to collect them into paper envelopes and to avoid polythene [plastic], which can badly interact with humidity. To find many interesting species is important to look in particular habitats like rocks, trunks, soil and other plants, remembering to carry a magnifying glass. During drying, which should be begun quickly, you must be careful not to overcook the specimen if heat is used. FUNGI AND LICHENS For collecting fungi it is better to use a basket along with paper to keep the specimens separated. Only fresh specimens in good conditions should be collected; it is possible to pick many specimens of the same species if they show different development stages. Always look carefully before picking a fungus to detect the presence of parts hidden in the soil (pick them up too). Remember to take note of the habitat and, if the fungus is parasitic, look where it grew. Besides, some relevant characteristics could changed after collecting the specimen, so observe whether color changes occur, note the presence of latex, the consistency, the odor and so on.
An interesting feature to add to the collection is the spore print, which is done leaving the specimen overnight with its hymeneal surface downwards onto a white sheet of paper. A quick drying must soon follow, keeping the specimens at a temperature of approximately 40 C, avoiding lower temperatures and dampness. Larger fungi should be cut in two or more parts to allow drying. Before placing the fungi in the herbarium it is better to leave them in a freezer for two days, to kill any insects or eggs. The specimens, if not particularly fragile, can be kept in paper envelopes (18 x 12 cm. or less) with their data, then glued to standard herbarium sheets. The delicate species, as many fungi are, will be placed in a small cardboard box (approx. 7.5 x 4.5 x 1 cm.) within the paper packets. Lichens should not be pressed and, once dry, they must be placed in packets on sheets with their data. ANCILLARY COLLECTIONS The preservation of plants (or parts of them) in liquid medium allow the maintenance of the natural three dimensional aspect of the specimen, so that various techniques have been developed to keep plants in spirit. Some groups like orchids or succulents are always better kept in spirit rather than on mounting sheet. Different preservative liquids can be formed using alcohol, formalin or other components, which can be rather dangerous to handle. The Kew preservative is a mixture of 53% industrial methylated spirit (i.e. ethanol + 2-4% methanol + 9% water), 37% water, 5% formalin solution in water and 5 % glycerol. The glass jars for the ancillary collection can range from 70 to 3000 cc and they must have wide necks. THE ORIGIN OF HERBARIA The first botanist to be credited as the inventor of the herbarium is Luca Ghini (1490-1556) from Bologna, Italy. He was a well known teacher who had a collection of about 300 specimens (in 1551), that were gummed on paper. Not much is currently known about his herbarium, which is now lost, even though the herbarium of Ghini's pupil Gherado Cibo is still preserved in Rome.
Then there are various references of an herbarium made by John Falconer, an Englishman who probably met Ghini in Italy. In the middle years of the sixteenth century three Ghini students, namely Aldrovandi and Cesalpino from Italy and Turner from England, also made their own herbaria. Cesalpino's herbarium, currently in Firenze, is very important as it can be compared with his book "De Plantis Libri XVI", which introduced a scientific approach to the study and classification of plants. In various European cities there are currently preserved more than twenty herbaria created before 1600. The first recorded publication dealing with making a herbarium is dated 1606, written by the Brussels native Adrian Spieghel. In "Isagoges", a botany treatise, we can read how to dry plants under a press and what kind of paper one should use, along with other accurate information. On the other hand, the first time the word "herbarium" have been used in the same way we intend it is in the book "Elemens" by Pitton de Tournefort. During the seventeenth century other herbaria were developed, such as the one in the Muséum National d'histoire Naturelle in Paris. In that period many collections of exotic plants were been created, as a result of the many geographical explorations which took place. Some of these exotic herbaria have been of the greatest importance for the advancement of scientific knowledge of some areas like Asia or Africa, and can be currently seen in a few European museums. REFERENCES Many books can give you details on how to start and build a herbarium, though this essay could be enough for a private collection. However, if you want to know more about some particular topic, or if you want to build a large scientific herbarium which is supposed to include species from distant places, you are encouraged to ask an advice to your local herbarium (or museum of natural history) employees or botanists, and to look for books in university libraries and in scientific book stores. About the plants identification and classification, you may again ask botanists and book stores employees to know which are the best handbooks regarding the geographic areas of your interest. Here is a short list of books which may be of some help (especially the first one): · Forman L. & Bridson D. (1989). "The Herbarium Handbook" RoyalBotanic Gardens, Kew
· Franks J.W. (1965) "A Guide To Herbarium Practice" Handbook For Museum Curators, Museum Association, London
· Holmgren P.K., Keuken W., Shofield E.K. (1981) "Index Herbariorum, Part I. The Herbaria Of The World" 7th Ed Regnum Veg., 106
· Womersley J.S. ( 1981) "Plant Collecting And Herbarium Development"Fao Plant Production And Protection Paper, 33, Xi, Rome Many thanks to Dr. Morsetti of the Herbarium of Bologna |